
One of the more useful things I’ve setup in my house recently has been the ability to network boot any machine. It’s made my life so much easier if I need to run a diagnostic or switch to gparted if I mess up an install.
Configuring nas4free In order to boot from the file server, we need to have a static IP on it so that pfSense points PXE clients to the right place, all the time.
Go to Network -> Lan Management. Set the IPv4 Type to be “Static”, then set a static IP for your server (XXX.YYY.ZZZ.WWW) that will not conflict with your DHCP settings. You will also need to set your Gateway IP.
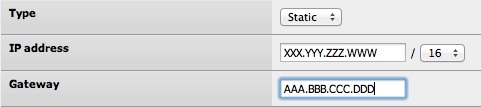 Figure 1 - Setting a static IP
Next, you need a tftp share to hold the required files. Under Services -> TFTP, check the enable box, then choose a folder to share.
 Figure 2 - Enabling TFTP
Configuring pfSense First thing we need to do is to configure pfSense to point any PXE devices to our file server.
Under Services -> DHCP Server, click advanced beside the “TFTP server” option and enter the IP of your file server (XXX.YYY.ZZZ.WWW).
 Figure 3 - Enter your file server IP here
Next, click advanced by the “Enable network booting” option. Enter the IP of your file server (XXX.YYY.ZZZ.WWW) and the filename “pxelinux.0”. “pxelinux.0” is the boot executable that will handle loading the list of OSs’ and booting them.
 Figure 4 - Enter in the server IP and the file to boot from
Hit “Save” and you can now boot from your fileserver! Except that you need to set up the PXE data. That’s for part 2.